Follow Me On Social Media!
Butterfinger Bomb Cake: Irresistibly Gooey and Decadent Delight
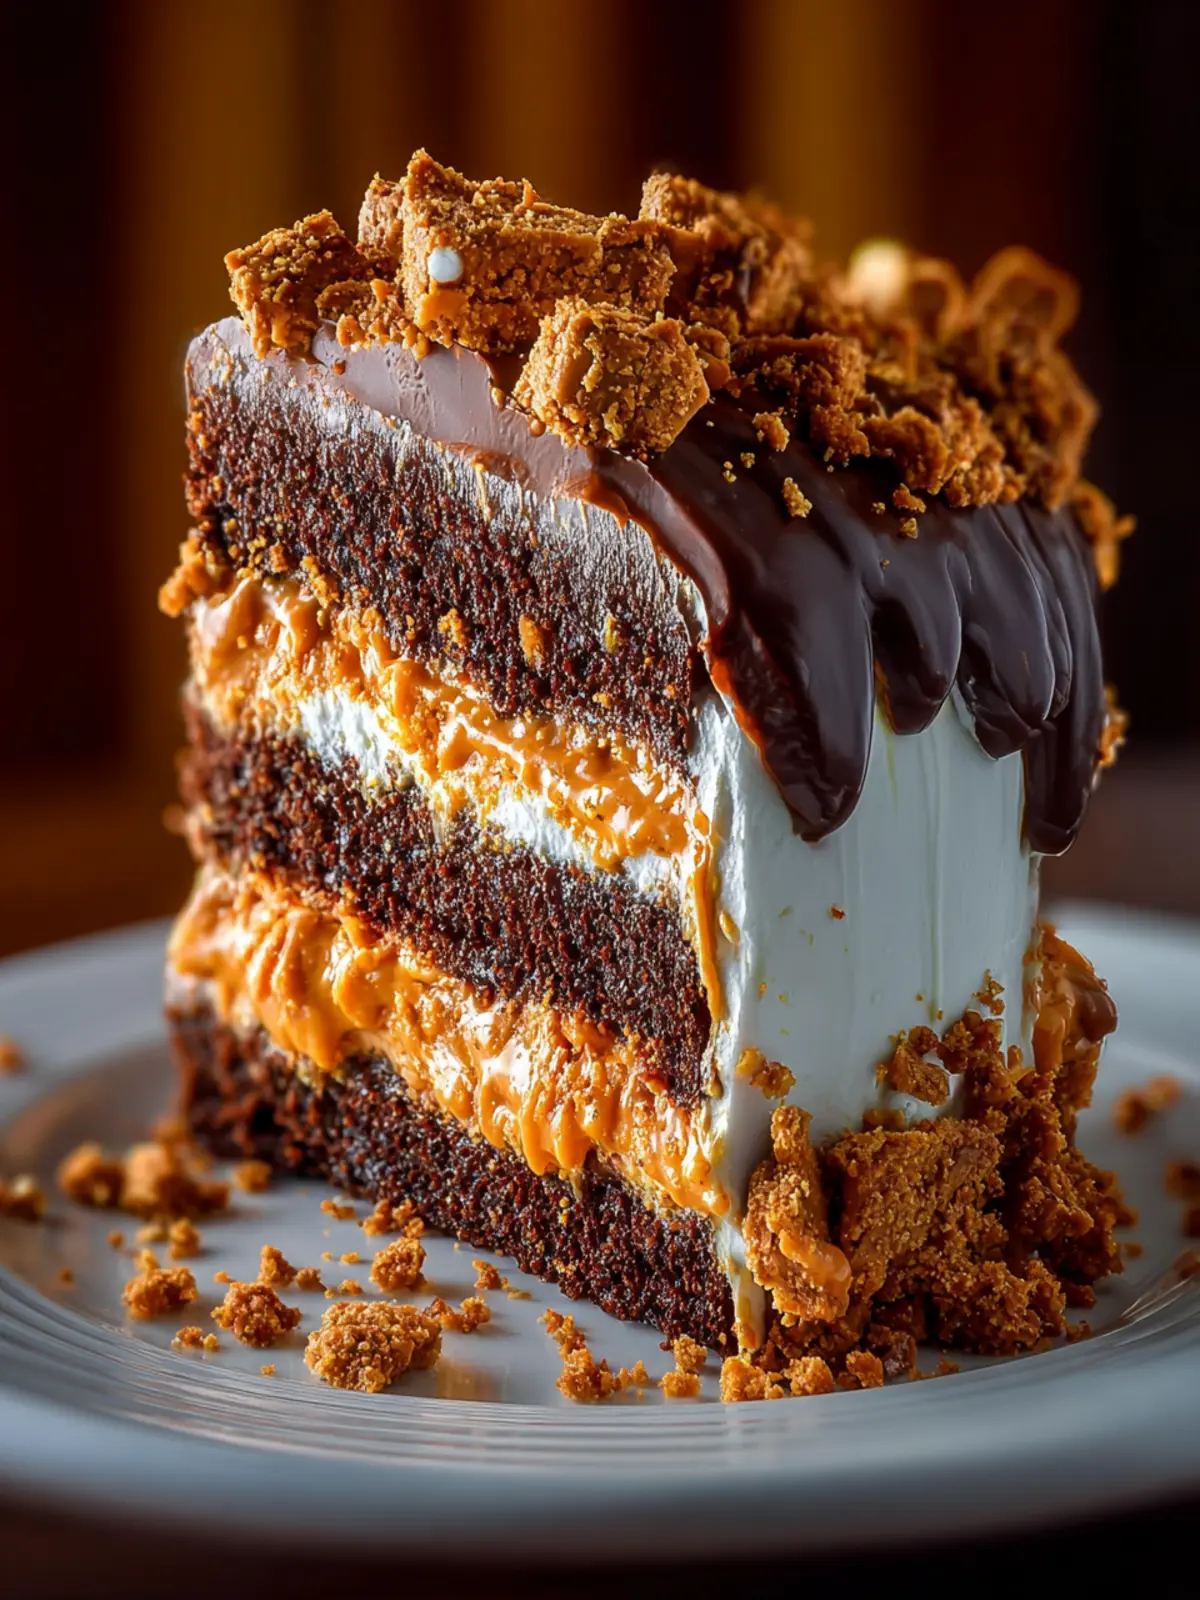
Introduction to Butterfinger Bomb Cake
Imagine a dessert that combines the creamy richness of chocolate with the satisfying crunch of a beloved candy bar—this is the magic of Butterfinger Bomb Cake. With each slice, you’re greeted with layers of moist cake, smooth fillings, and that delightful buttery peanut brittle taste that we all cherish from Butterfinger bars. It’s a harmony of flavors, textures, and nostalgia that instantly transports you back to those carefree childhood days.
Baking a Butterfinger Bomb Cake is not just about creating a sweet treat; it’s about crafting a celebration. Perhaps it’s your best friend’s birthday, or maybe you’re just looking to impress your weekend guests. Regardless of the occasion, this cake is sure to steal the show. Each bite is indulgent yet surprisingly balanced, making it hard to resist going back for more. The vibrant colors of the cake, contrasted with the golden crunch of the Butterfinger topping, not only satisfy the taste buds but also create a feast for the eyes.
What makes a Butterfinger Bomb Cake irresistible?
The irresistible nature of a Butterfinger Bomb Cake is rooted in its delightful layers. Think of fluffy cake, nestled alongside layers of creamy frosting and crunchy Butterfinger bits that bring a familiar texture to the mix. The combination of sweet and salty flavors creates an unmatched depth that keeps everyone guessing what makes it so delectable—it’s the surprise element that everyone seeks from a great dessert.
Let’s not forget the nostalgia factor either. Many of us grew up enjoying Butterfinger bars, whether sneaking bites from the candy aisle or trading them during Halloween. Baking this cake is like reclaiming a little piece of that joy and sharing it with those you love. From the first slice to the last crumb, the Butterfinger Bomb Cake is a sweet reminder that simple pleasures crafted in the kitchen can lead to extraordinary moments.
So, if you’re ready to dive into this decadent dessert and bring a bit of childhood magic to your table, let’s get started!

Key Ingredients for Butterfinger Bomb Cake
The magic of Butterfinger Bomb Cake lies in its delightful combination of flavors and textures. This dessert is a dream come true for anyone who loves the crunchy and creamy contrast of Butterfinger candy bars. To create this indulgent treat, here’s what you’ll need to gather:
Butterfinger Candy Bars
Start with a generous supply of chopped Butterfinger candy bars. Their unique blend of chocolate and peanut butter adds a delightful crunch that makes this cake extra special.
Cake Mix
I typically use a box of chocolate cake mix for convenience. It’s a great base that saves time while ensuring a moist and fluffy texture.
Eggs
Using large eggs, which bring moisture and richness, is essential. They help bind the ingredients together and give the cake structure.
Vegetable Oil
Adding vegetable oil to the batter makes the cake incredibly moist. Plus, it’s neutral in flavor, allowing the Butterfinger essence to shine through.
Milk
Using whole milk enriches the batter, adding creaminess that balances the flavors perfectly.
Whipped Topping
For a frosting-like finish, whipped topping adds a light and airy texture that complements the cake without overwhelming it.
Peanut Butter
A touch of creamy peanut butter elevates the cake with that beloved peanut flavor; it pairs wonderfully with the Butterfinger pieces.
Each ingredient plays a crucial role in crafting the perfect Butterfinger Bomb Cake, allowing you to indulge in a slice that captures childhood nostalgia while satisfying your sweet tooth.
Why You’ll Love This Butterfinger Bomb Cake
The Butterfinger Bomb Cake is not just a dessert; it’s a celebration on your plate, wrapped in nostalgia and decadence. Imagine biting into a slice that perfectly melds rich chocolate cake with the crunchy, peanut buttery goodness of Butterfinger bars—it’s a treat that takes you back to your childhood while providing an indulgent experience that’s perfect for any gathering.
Irresistible Flavor Combination
What makes this cake truly stand out is its incredible blend of flavors and textures, creating an explosion of taste that’s hard to resist. The rich, chocolatey layers pair beautifully with smooth frosting, while the Butterfinger pieces add delightful crunch.
Perfect for Any Occasion
Whether you’re hosting a birthday party, a potluck, or just treating yourself after a long week, this cake is versatile enough for any occasion. It becomes a conversation starter, with everyone eager to find out how you created these delightful layers and that secret ingredient that makes it pop.
Easy to Make, Hard to Resist
Crafting the Butterfinger Bomb Cake might sound a bit intimidating, but the steps are straightforward and enjoyable. Plus, the reactions you’ll receive as guests take their first bites? Simply priceless.
Make this cake the centerpiece of your next gathering, and you’re sure to create fond memories around the dessert table!

Tips for Creating the Perfect Butterfinger Bomb Cake
Crafting an unforgettable Butterfinger Bomb Cake begins with a few key insights that elevate your baking game. Each element plays a vital role in the final masterpiece, ensuring it impresses everyone.
Choose Quality Butterfinger Bars
Start with fresh Butterfinger bars. Their crisp texture and unique flavor make all the difference. Check for bars that don’t have any visible signs of melting or age; freshness is critical for that delightful crunch in every bite.
Layer Wisely
When assembling your cake, consider how you layer the components. Begin with a base layer of cake followed by a generous spread of frosting. Sprinkle crushed Butterfinger pieces in every few layers, which creates an explosion of flavor. The more layers, the more delicious crunch you’ll have!
Chill Properly
Let your cake chill for a while after frosting. This not only helps the layers set, making them easier to slice, but also allows the flavors to meld beautifully. Trust me, patience pays off here!
Presentation Matters
Don’t skimp on the finishing touches. A drizzle of chocolate ganache and a final sprinkle of crushed Butterfinger will make your cake visually appealing and serve as a teaser for what’s inside.
By following these tips, your Butterfinger Bomb Cake will not only taste heavenly but also be a true showstopper at any gathering. Happy baking!
Time Breakdown for Butterfinger Bomb Cake
Creating a Butterfinger Bomb Cake is a delightful culinary adventure that invites you into a world of indulgent flavor and texture. By breaking down the time required for each step, you can plan your baking session with ease and excitement.
Preparation time
Expect to spend about 20 minutes on preparation. This includes gathering your ingredients, preparing the cake batter, and mixing your Butterfinger pieces into the delightful cream layer that will elevate your cake’s flavor.
Baking time
Once everything is prepped, the cake will need approximately 30-35 minutes in the oven. Keep an eye out, as your kitchen will soon fill with the irresistible aroma of baking chocolate and peanut butter!
Total time
From start to finish, including preparation, baking, and cooling, anticipate around 1 hour and 15 minutes. Trust me, every minute spent on this Butterfinger Bomb Cake will be worth it when you take that first mouthwatering bite!

Nutritional Information for Butterfinger Bomb Cake
When you indulge in a slice of Butterfinger Bomb Cake, knowing the nutritional facts can help you enjoy it even more guilt-free. This delightful dessert brings a creamy, crunchy twist that’ll make your taste buds dance.
Calories
Each serving contains approximately 350 calories, making it a rich treat perfect for celebrations or a sweet reward after a long week.
Protein
You can find around 5 grams of protein per slice, thanks to the creamy textures and ingredients that add a little nutritional kick while still satisfying your sweet tooth.
Sodium
With an estimated sodium level of 200 milligrams per serving, it’s wise to enjoy this decadent cake in moderation, especially if you’re watching your intake.
Overall, enjoying Butterfinger Bomb Cake in reasonable portions allows you to savor the dessert while still being mindful of your daily nutritional needs.
FAQs about Butterfinger Bomb Cake
When you first take a bite of Butterfinger Bomb Cake, you might find it hard to believe you created something that tastes like a candy bar in cake form. As tempting as it is, sometimes we have questions, and that’s perfectly okay! Here are some helpful answers to your most common inquiries.
Can I use different types of chocolate for this cake?
Absolutely! While the classic Butterfinger Bomb Cake shines with milk chocolate, feel free to experiment with dark chocolate or even white chocolate. If you prefer a richer flavor, dark chocolate will deepen the taste profile. Alternatively, white chocolate adds a lovely sweetness, balancing perfectly with the saltiness of the Butterfinger pieces. Just ensure the consistency remains smooth when melting.
How should I store leftover Butterfinger Bomb Cake?
Storing leftover Butterfinger Bomb Cake is simple! Keep it in an airtight container at room temperature for up to three days. If you need to store it longer, refrigerate it, where it can last for about a week. For maximum freshness, you can freeze individual slices wrapped in plastic wrap followed by foil. Thaw them at room temperature before enjoying.
How do I cut the cake without making a mess?
Cutting a Butterfinger Bomb Cake can be a bit tricky due to its gooey layers. A few tips can help:
- Use a sharp, serrated knife to gently saw through the cake rather than pressing down hard.
- Wet the knife with warm water before cutting; this helps to slice smoothly through the layers.
- Clean the knife between cuts to maintain clean edges.
These techniques should keep your slices looking appetizing and ready for serving!
Conclusion on Butterfinger Bomb Cake
The Butterfinger Bomb Cake delivers on every front, combining flavors and textures for a truly unforgettable dessert. Imagine sinking your fork into layers of rich chocolate cake, creamy filling, and crunchy bits of Butterfinger that create a delightful contrast. Each slice tells a story of nostalgia, reminiscent of those cherished childhood candy bars. Whether you’re celebrating a special occasion or simply indulging on a quiet evening, this cake is sure to impress friends and family alike. So whip up this showstopper, and let your taste buds revel in the sweet symphony of chocolate and peanut butter bliss.
Print
Butterfinger Chocolate Cake
- Total Time: 2 hours 30 minutes
- Yield: 12 servings 1x
- Diet: Contains dairy
Description
This delicious Butterfinger Chocolate Cake features layers of rich chocolate cake, whipped cream, and crushed Butterfinger candy for a delightful dessert.
Ingredients
Scale
- 2 cups heavy whipping cream
- 1/2 cup powdered sugar
- 1 teaspoon vanilla extract
- 1 cup caramel sauce
- 6 regular-size Butterfinger bars, crushed
- 1/2 cup chocolate ganache or melted semi-sweet chocolate chips
- 1 box devil’s food chocolate cake mix
- 3 large eggs (as listed on cake mix box)
- 1/2 cup vegetable oil (as listed on cake mix box)
- 1 1/4 cups water (as listed on cake mix box)
- 1 teaspoon vanilla extract (optional)
Instructions
- Preheat oven and prepare cake mix according to box instructions, adding 1 teaspoon of vanilla extract if desired.
- Divide batter between two 9-inch round cake pans and bake as directed (about 25–30 minutes).
- Let cakes cool completely, then slice each in half horizontally to create 4 thin layers.
- Chill your mixing bowl and beaters for 10 minutes. Whip heavy cream, vanilla, and powdered sugar to stiff peaks.
- Crush Butterfinger bars using a ziplock bag and rolling pin, leaving some chunks for texture.
- Place first cake layer on a serving plate. Spread whipped cream over the top.
- Sprinkle with crushed Butterfingers and drizzle with caramel sauce.
- Repeat with remaining layers: cake, cream, Butterfingers, caramel.
- After stacking all layers, pour slightly cooled ganache over the top. Let it drip down the sides.
- Garnish with extra crushed Butterfingers and optional chocolate/caramel drizzle.
- Chill the cake for at least 2 hours or overnight before serving.
Notes
- This cake can be prepared a day in advance for improved flavor.
- Store leftovers in the refrigerator.
- Prep Time: 30 minutes
- Cook Time: 30 minutes
- Category: Desserts
- Method: Baking
- Cuisine: American
Nutrition
- Serving Size: 1 slice
- Calories: 400
- Sugar: 30g
- Sodium: 200mg
- Fat: 20g
- Saturated Fat: 10g
- Unsaturated Fat: 5g
- Trans Fat: 0g
- Carbohydrates: 50g
- Fiber: 2g
- Protein: 4g
- Cholesterol: 80mg


